






Every now and then, life hands people a problem that didn’t come with an instruction manual.
For example, someone was at a total loss after leaving a metal pot on a plastic trash can, only for the sun to melt a chunk right out of it. Another person had a nightmare roommate who left behind a solid block of dried concrete under the bed on his way out.
But before pulling out their credit cards to spend hundreds of dollars on replacements, these people turned to Reddit for a Hail Mary fix.
Some users offered surprisingly practical step-by-step solutions, while others cracked jokes to help make light of a hopeless situation. After all, when dozens of people tell you something can’t be fixed, it either helps you accept defeat or gives you the drive to prove them wrong.
Scroll through the list… you might just learn a genius trick to save an item you can’t let go of.
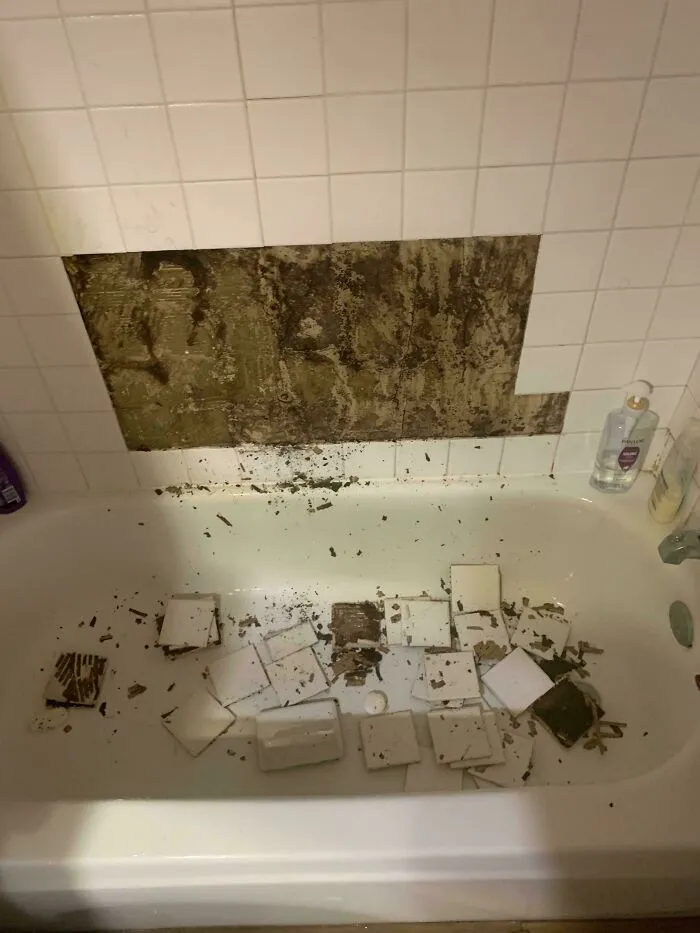
#61 Heeelppppp I Have Till Friday To Fix This
bucobill:
This is caused from putting tile on drywall in a wet environment. You need concrete backer boards. Then retile. Good luck.
This is caused from putting tile on drywall in a wet environment. You need concrete backer boards. Then retile. Good luck.
Report
7points
#62 Wife Took A Candlelit Bath And Melted A Hole In The Shower Shelf. Any Ideas?
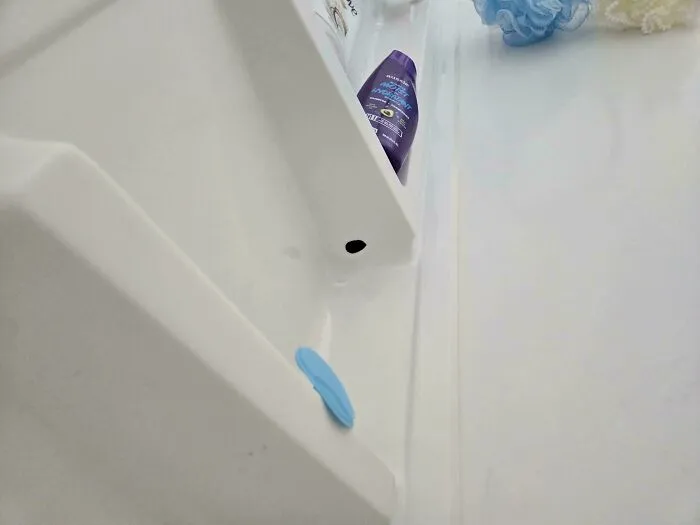
Her candle placement was less than optimal and she realized after a little while she had melted a hole into the plastic shell of the shower. I don't even know where to start. Putty/Spackle, paint, then clear coat epoxy? Any other ideas?
Patacrow:
I used to repair these fiberglass tubs professionally. I couldn't tell you where to get your hands on the proprietary solution WE would spray but it was very similar to a boat gel coat. Lowe's/Home depot have a similar solution in cans though. As to filling the hole, get a piece of card board put a screw in it and get it inside the hole, use a two part filler and fill it in holding the cardboard firmly against the repair, allow it to cure unscrew the screw and fill the smaller hole with more filler, sand smooth and coat with the spray can tub repair stuff from a big box hardware store
Report
7points
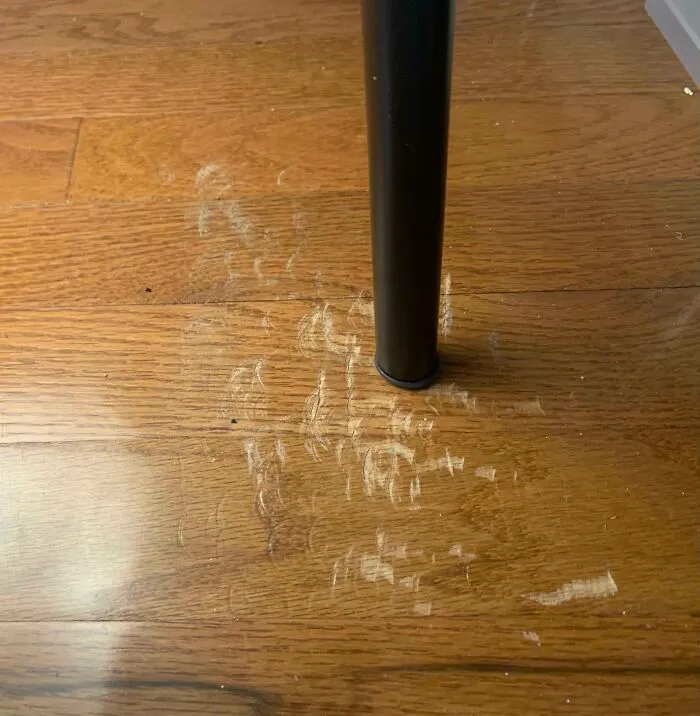
#63 Help Me Fix Apartment Floor Damage From Bed Fame
Dopplerganager:
Next apartment use felt feet or something.
PiperAce24:
Use walnuts. Rub and basically fill in the marks as the nuts break apart. YouTube it
Next apartment use felt feet or something.
PiperAce24:
Use walnuts. Rub and basically fill in the marks as the nuts break apart. YouTube it
Report
7points
#64 My House Sweats Like Crazy During The Winter And It’s Causing Mold.. Please Help!!
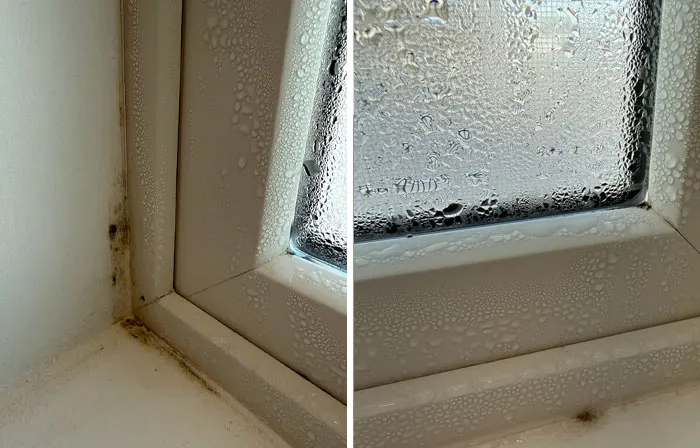
My house is BRAND new, literally finished construction in August of 2024. I live in the Midwest so of course it gets very cold in the winter. Last year, the windows of our house were sweating so badly every time the outside temp was under 30°f that water was pooling up on the windowsills and we called the construction company (we were still under new build warranty) and they told us to always have the house fan running and to turn on our ceiling fans. That worked for a time and the condensation wasn’t as bad after that. It started to warm up shortly after and we didn’t have anymore issue. Flash forward to this past week, it’s been in the negatives here. There is SO much condensation on my windows that mold is starting to grow, our curtains are freezing stuck to the glass in some rooms, and it’s attracting gnats somehow?! I don’t even know where the hell they’re coming from with the weather like this. I’m constantly cleaning and I feel so so so disgusted with all this going on, what can I do to fix it? Please help!
engineeringmanager69:
Had the same issue. Insulation was not enough around the window and caused the window and walls tho sweat. Had to rip out the drywall around the window and windowsill and replace with much better and thicker insulation. Have not had an issue since. Yes and trickle helps too
engineeringmanager69:
Had the same issue. Insulation was not enough around the window and caused the window and walls tho sweat. Had to rip out the drywall around the window and windowsill and replace with much better and thicker insulation. Have not had an issue since. Yes and trickle helps too
Report
6points
#65 How Do I Fix Moisture Marks
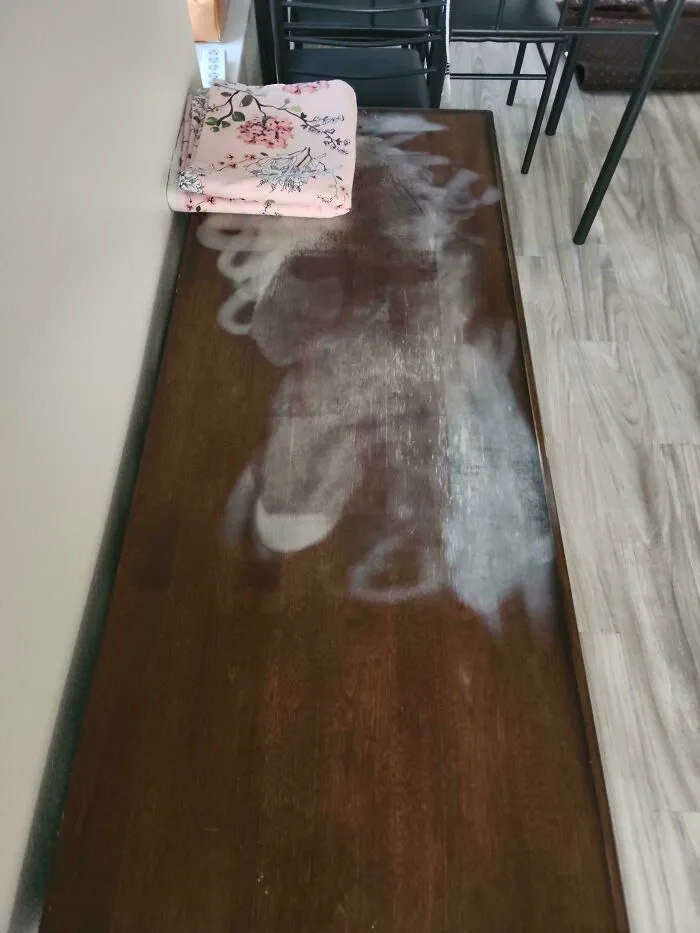
I was ironing my clothes on my wooden table and ended up causing this. Please help me fix it.
DirtGirl32:
Put down a brown banner bag. Iron the table through the bag . Edit: Brown Paper Bag. I such at typing.
DirtGirl32:
Put down a brown banner bag. Iron the table through the bag . Edit: Brown Paper Bag. I such at typing.
Report
6points
#66 Lino Got Damaged When Putting The Washing Machine In; How Can I Fix Before My Landlord Inspection This Weekend??
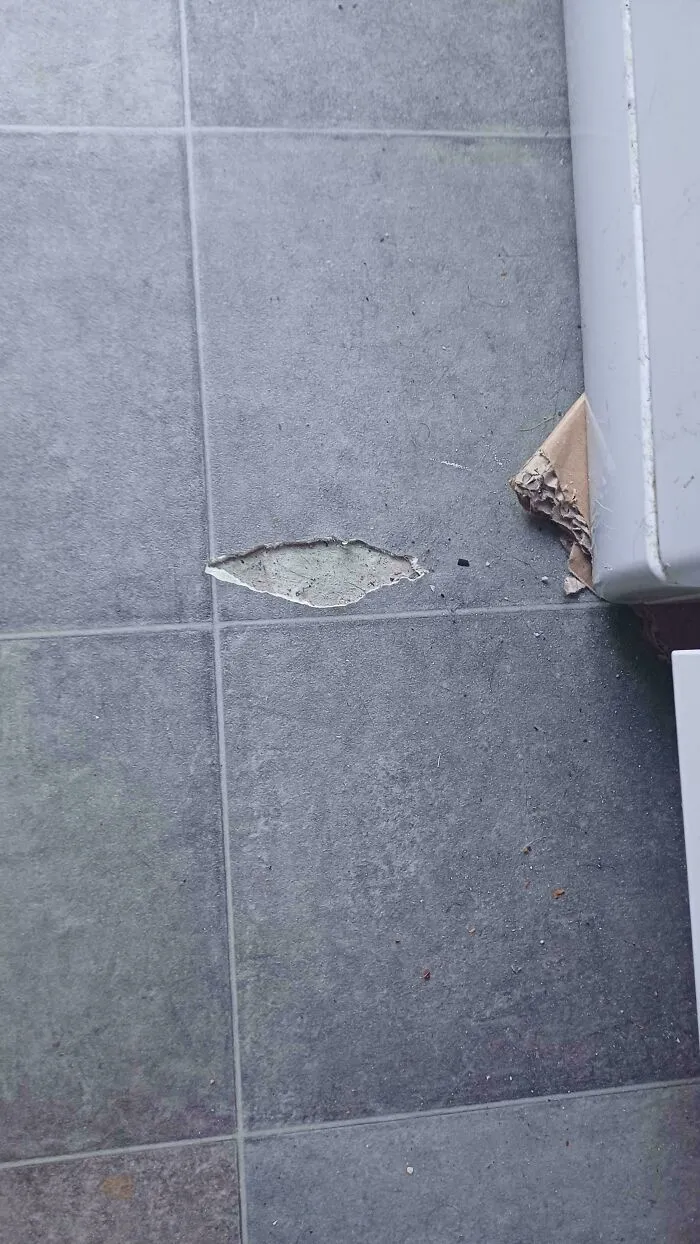
I'm in the UK if that affects the advice lol
BikerBoy1960:
Get a strong friend to help you move the wash machine out, onto a clean piece of cardboard. Then, using a surgically sharp linoleum knife and a straightedge, cut out the complete square which is damaged. In the space which houses the machine, trim out an identical square, remove it, swap the two, using a clear-drying adhesive and some heavy weights to keep the pieces perfectly flat. Then move the machine into place. Then, start looking for a new place to live; he’ll find it eventually…
Report
6points
#67 I Have A Gas Stove, The Fire Wont Go Out Through The Spreader
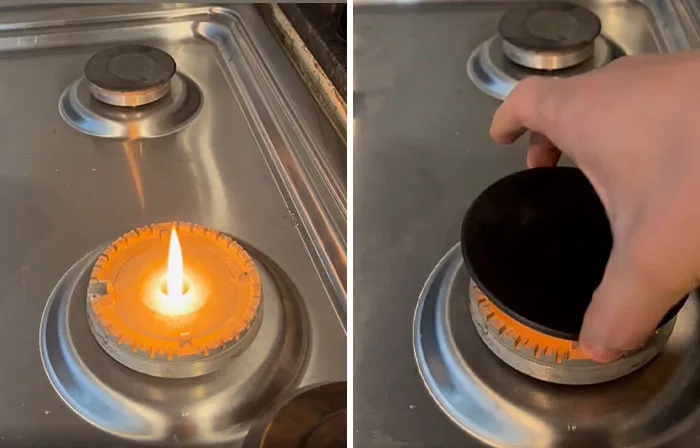
I cleaned my stove yesterday. I used my stove appropriately after cleaning it. Today the stove wont ignite unless I remove the lid and provide a fire directly to the gas. Once I put the lid back on, the fire wont go through the spreader. Video attached. How to fix?
Crypt0-n00b:
Classic sign on low pressure, probably maintenance in your area. Check if not might be a valve on your end.
Crypt0-n00b:
Classic sign on low pressure, probably maintenance in your area. Check if not might be a valve on your end.
Report
6points
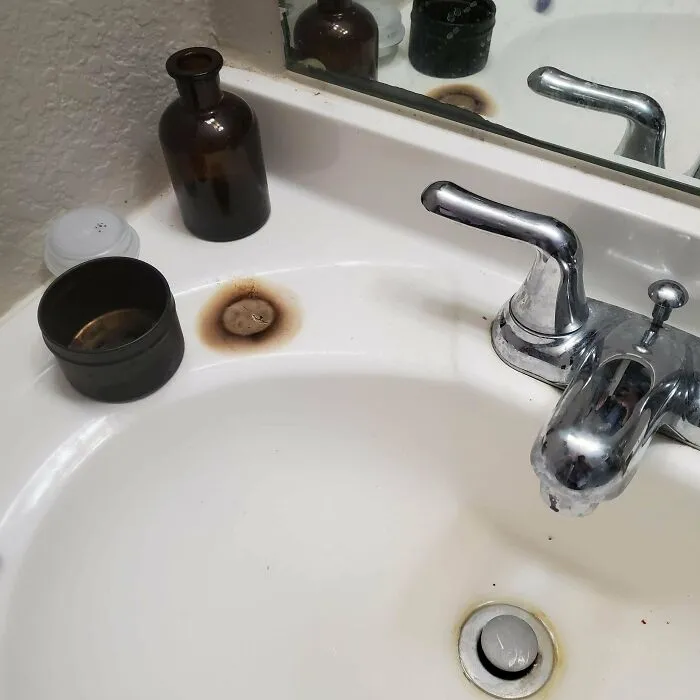
#68 Candle Burned Down And Damaged The Sink Countertop. I'm Renting, How Screwed Am I?
Jimmyjames150014:
Buy a rattle can of gloss white appliance epoxy paint. Will last at least long enough to get your deposit back
Buy a rattle can of gloss white appliance epoxy paint. Will last at least long enough to get your deposit back
Report
6points
#69 Electricians Left Us Several Of These Holes After Replacing Knob And Tube
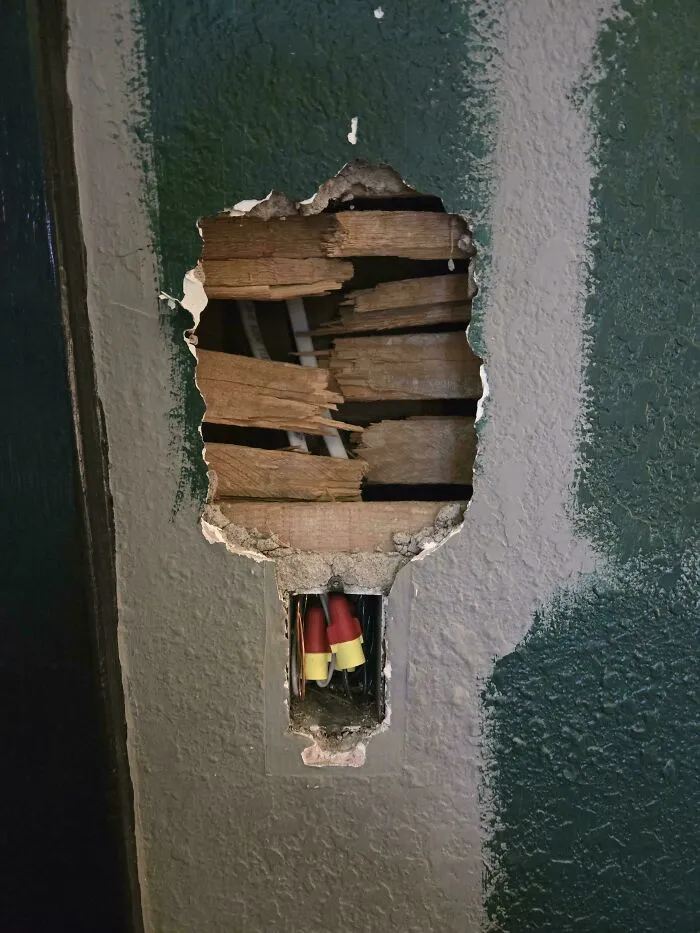
As the title states, we hired electricians to replace our knob and tube, and they left us some significant mess. There are some spots where the lathe is cut away. They warned us there would be some holes, but I wasn't expecting this level destruction. Too late now! Is this the kind of thing I can use a mesh patch on, or does anyone have any experience or guidance repairing this?
cheekymonkey516:
I’ve fixed holes this size on plaster walls. Put some sort of thin solid backer into the hole. Scrap wood, fiberboard, whatever. Glue or screw it to the lathe. Mix Sheetrock mud with powdered Rock Hard. Slap it in place, let it dry, repeat until built up to level. Feather the edges over the existing plaster. Lightly sand, prime, paint. Takes a few days with dry time but it’s easy. The rock hard reinforces the loosy edges of the plaster and helps the mud set.
Report
6points
#70 Locked Inside Apartment, Help
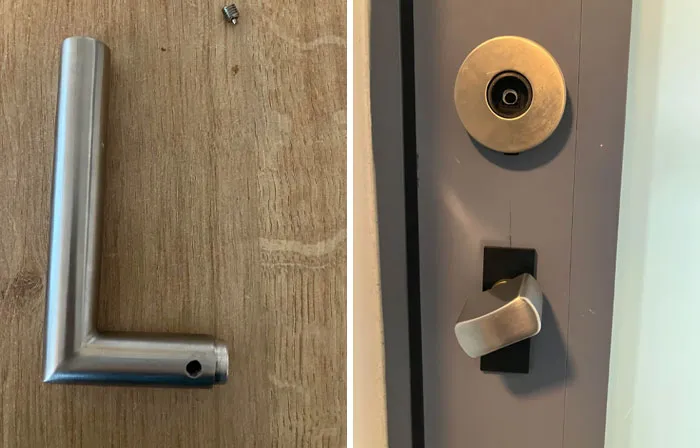
Hello, the door knob for my front door fell off and I literally cant get out of my apartment. Is there anything I can do or should I call the firefighters ? The knob isn’t reattaching at all and nothing I try to insert fits Edit : I managed to fix it! My roommate woke up and helped me with opening the door from the inside. The knob disconnected because the outside knob got somehow pushed all the way out, leaving the inside one with nothing to latch onto. I'm not sure what my roommate did but if she hadn't been here, this could've been fixed by having someone from the outside push the knob in. I reattached the door handle again but I'll be in contact with my landlord to get it replaced.
builtfromscratch416:
That should slide onto the square rod sticking out of the door. Then you tighten the little screw into the hole on handle so it "grabs" rod. If there's no square rod, it has fallen out the other side. In this case. You will see a square hole. Wedge something into the square hole (flat head screwdriver, spoon handle whatever) now turn so the square hole rotates. Probably left but whatever. Easy peasy
Report
6points
#71 Sink Just Gave In While Doing Dishes. Anyone Know How To Fix This?
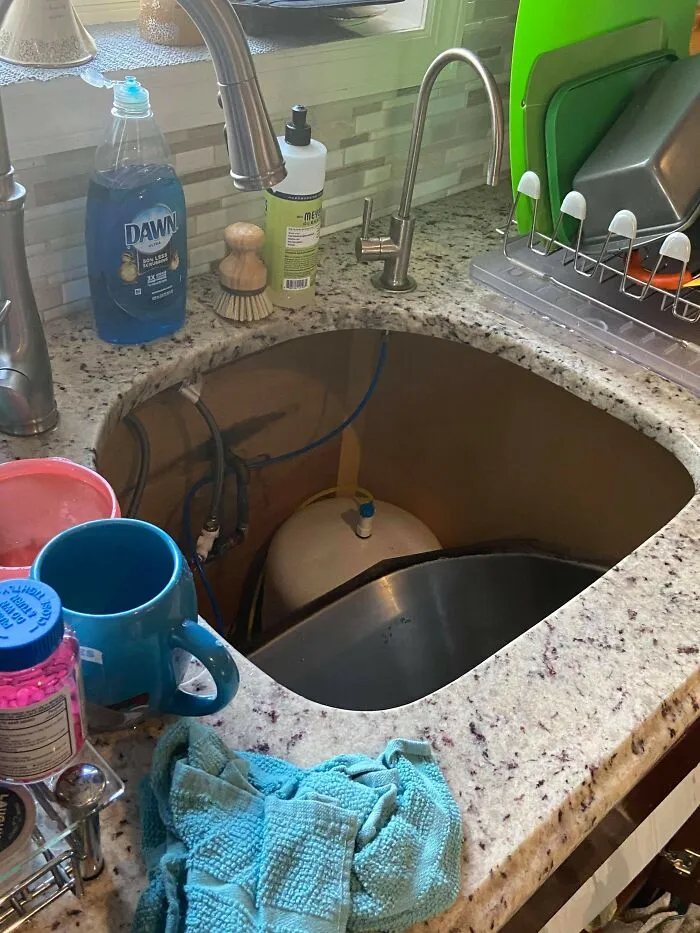
Anonymous:
Hi OP. Plumber here. If you are somewhat handy it’s an easy fix. First, you’re going to need some material. Silicone (I prefer clear when working with stainless sinks) and metal 1/2” steel strapping(the ones with holes in it to screw through) You can find this at your local hardware store. You’ll also need 4 small screws 3/4”-1” screws (you can use longer screws but please keep in mind you have to be careful not to screw all the way or you’ll penetrate into the next cabinet space). Next you’ll need something to hold the sink right in place while you fiddle with the strapping. I usually use a piece of 2x4 to wedge it up to the counter top while I strap the sink in place. To install: clean both surfaces that will be pressed up against the countertop and sink. Clean them well. Apply silicone to the sink surface, apply liberally, this will be to seal the sink from water NOT to hold the sink. Lift the sink into place carefully lining it up to where you want it. Once you have it pressed in place quickly wedge it with the 2x4 vertically. Make sure it’s held in place well. Next install 2 straps across the underneath of the sink with metal strapping, ensuring that they are very tight. This is what’s holding your sink. Clean the silicone from the countertop/sink. Helps if you wet your finger a bit. Reconnect drain line (it’s most likely busted from the sink falling on it)
Hi OP. Plumber here. If you are somewhat handy it’s an easy fix. First, you’re going to need some material. Silicone (I prefer clear when working with stainless sinks) and metal 1/2” steel strapping(the ones with holes in it to screw through) You can find this at your local hardware store. You’ll also need 4 small screws 3/4”-1” screws (you can use longer screws but please keep in mind you have to be careful not to screw all the way or you’ll penetrate into the next cabinet space). Next you’ll need something to hold the sink right in place while you fiddle with the strapping. I usually use a piece of 2x4 to wedge it up to the counter top while I strap the sink in place. To install: clean both surfaces that will be pressed up against the countertop and sink. Clean them well. Apply silicone to the sink surface, apply liberally, this will be to seal the sink from water NOT to hold the sink. Lift the sink into place carefully lining it up to where you want it. Once you have it pressed in place quickly wedge it with the 2x4 vertically. Make sure it’s held in place well. Next install 2 straps across the underneath of the sink with metal strapping, ensuring that they are very tight. This is what’s holding your sink. Clean the silicone from the countertop/sink. Helps if you wet your finger a bit. Reconnect drain line (it’s most likely busted from the sink falling on it)
Report
6points
#72 Slipped And Broke The Shower Wall. I Plan On Remodeling In About A Year, Any Temporary Fixes For This Until Then So Moisture Doesn't Get Behind It?
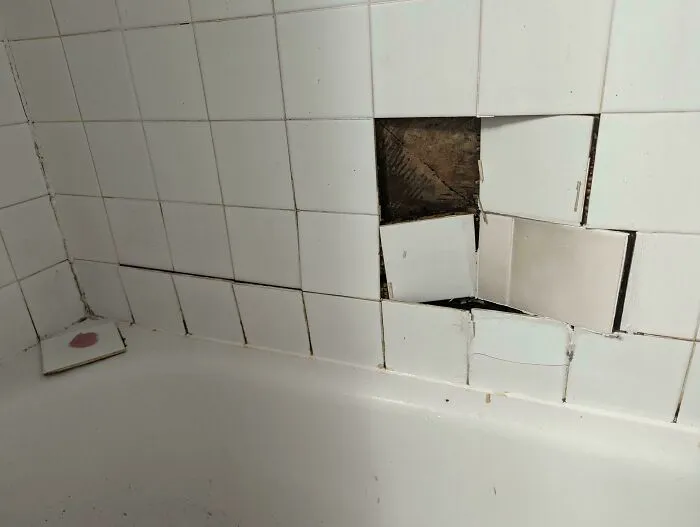
WNJohnnyM:
I had that happen 10 years ago in my house. I started the remodel sooner than I wanted.
I had that happen 10 years ago in my house. I started the remodel sooner than I wanted.
Report
6points
#73 Two Ceramic Pots Perfectly Got Stuck Together😭 I’ve Tried Soaking Them, Dawn, Goo Gone. Can’t Get Them Apart, There’s A Tiny Bit Of Wiggle Room. Any Tips Without Breaking Them?
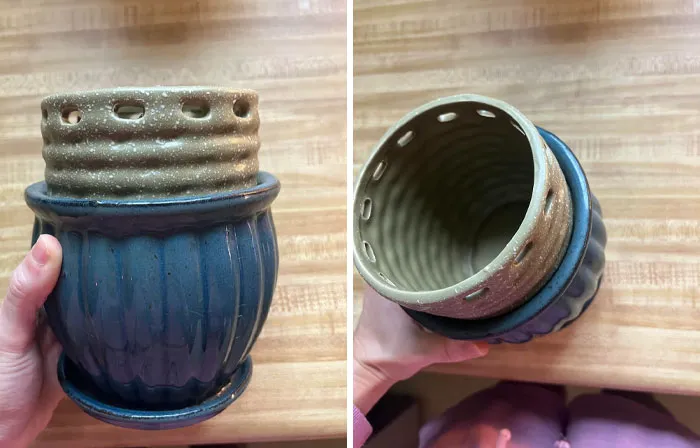
Funkdamentalist:
Does the top one still rotate? Could be locked in by some variation in the ridges. Perhaps you need to find the correct angle. Put a tab of tape on each pot to better visualize the relative rotation and start working your way through all 360 degrees.
Does the top one still rotate? Could be locked in by some variation in the ridges. Perhaps you need to find the correct angle. Put a tab of tape on each pot to better visualize the relative rotation and start working your way through all 360 degrees.
Report
5points
#74 Right On The Bus To School, Am I Cooked
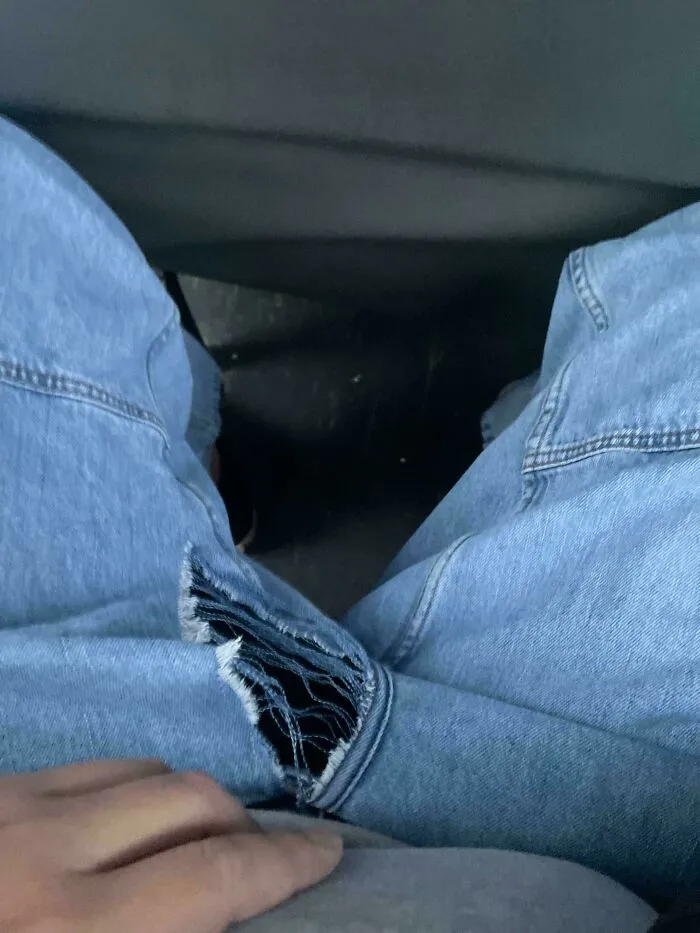
Any solutions?
Nesman64:
If you close it with pins, turn it inside out when you pin it so that most of the hardware will be hidden when you turn them right side out.
Nesman64:
If you close it with pins, turn it inside out when you pin it so that most of the hardware will be hidden when you turn them right side out.
Report
5points
#75 I Didn’t Realize My Planter Had A Hole At The Bottom For A Month - Help Me Save My Security Deposit!
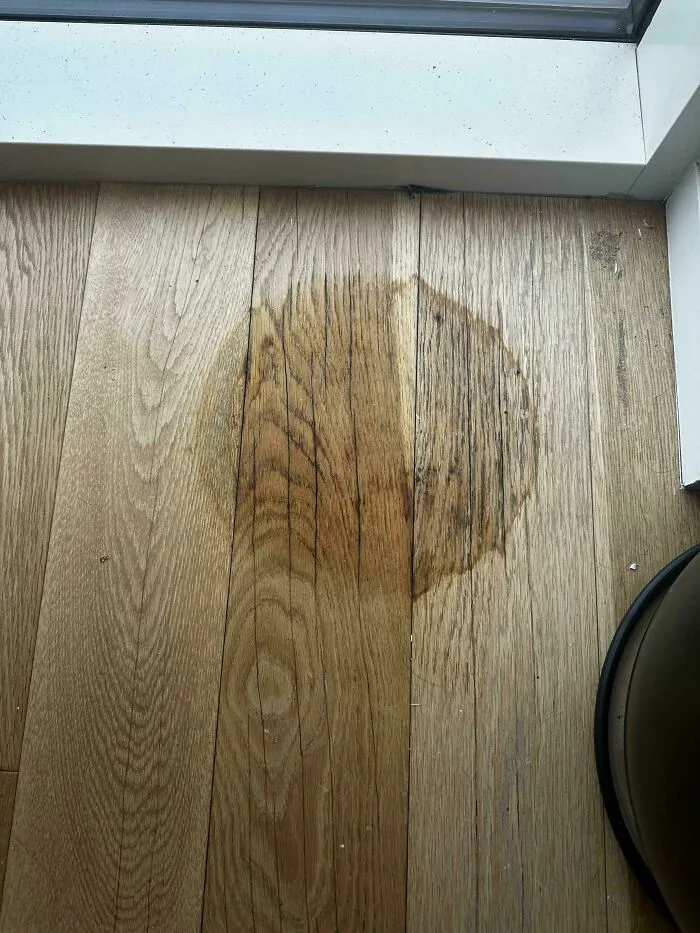
It's almost a foot in diameter, any chance I can salvage this?
GarbanzoBenne:
You can try peroxide. I've had very good luck using it to lighten or remove water spots in sanded/unfinished wood. Even though this floor is finished, the water penetrated the finish, so I expect the peroxide will be able to as well. I would just start with a little bit on a q-tip in a small area and see if it makes a difference and doesn't cause any other damage. As I mentioned, I've only done it on unfinished wood before.
Report
5points
#76 Why Is My Toilet Flashing Red?
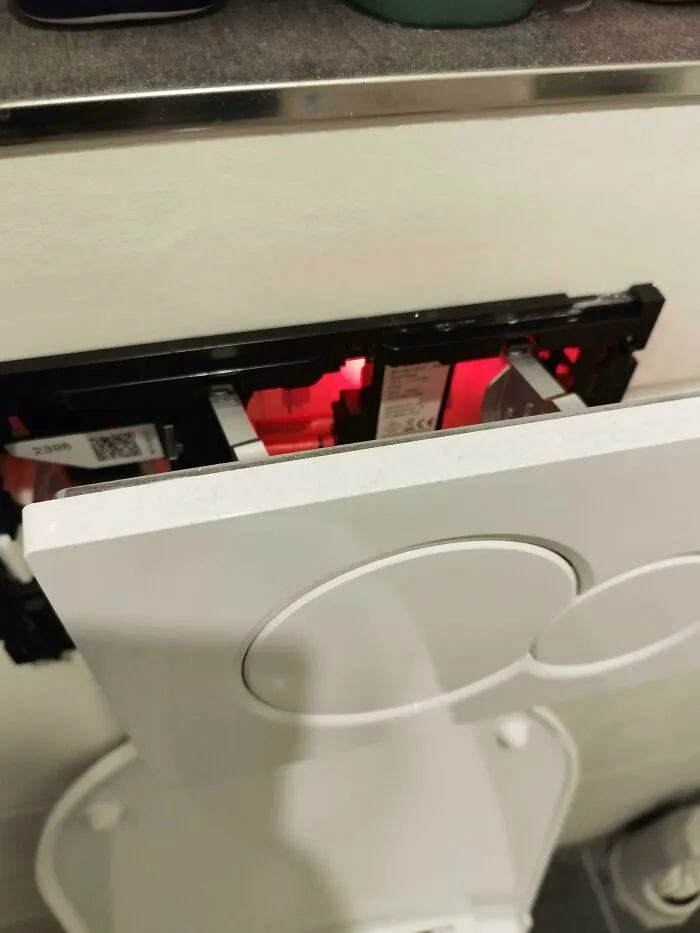
The light is flashing twice per second, turned off power twice but it just comes back, what's causing this and how to fix it?
eternal_ttorment:
I finally figured out that the issue is outdated firmware and that the filter needs replacement. The toilet is Geberit DuoFresh if anyone ever needs it. Thanks everyone for trying to help.
eternal_ttorment:
I finally figured out that the issue is outdated firmware and that the filter needs replacement. The toilet is Geberit DuoFresh if anyone ever needs it. Thanks everyone for trying to help.
Report
5points
#77 I’ve Fixed Drywall, But Never Wood, What Am I In For?
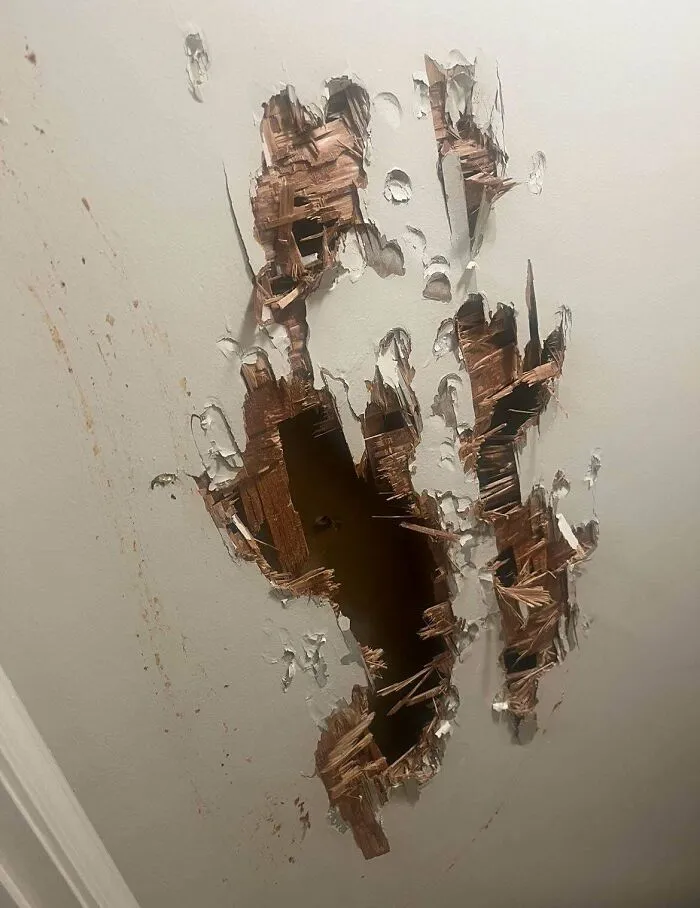
Aftermath of a bad mental health incident, take care of yourselves y’all
TheFishBanjo:
That is 1970's style paneling that someone painted over. Determine thickness. Buy a sheet of paneling. Find the seam to the left. Remove the whole sheet top to bottom. You might need to lift some trim to get out from under the baseboard and door trim. Cut and nail up new paneling as a rectangle. Paint. Restore trim.
Report
4points